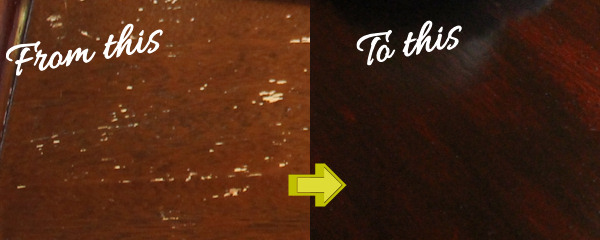
Refinishing a table can be an easy DIY project, that is both quick and inexpensive, especially if your main problem is the table top. I refinished the tops of my side tables one evening and they were ready for regular use the next day. I would like to note that I would be very reluctant to do this to an antique heirloom piece, but it is perfect for moderately priced tables with worn tops.
Many modern furniture pieces are made out of softer woods, sometimes combined with laminates and other materials. It is cheaper for them to manufacture and looks good when you buy it, but the finish doesn’t last, especially if you are like me and prefer darker wood tones for much of your furniture. These side tables have soft wood legs and rim, with what I think is a veneer top. The wood is prone to dings and the finish lifted on the table top from glasses being put on it. As a single mom, I don’t have cash to run out and get new tables, so the options were repair, live with or toss & live without.
I opted to spruce them up, but was not about to invest long hours “doing the job right”, on cheap tables. I would hack this one.
I already had a matching stain pen on-hand. I have a couple of them, and use them to fill in scratches, dings and scuffs on wood finishes around the house. If you don’t have some of these in your junk drawer, you should. I also grabbed a small can of Poly Shades in a color similar to the tables, at my local home improvement store. This product is basically a tinted polyurethane.
- If you have prominent scratches, fill them in with stain pen. Leave for about a minute then wipe clean with paper towel or rag.
- Clean down the surface very well. You don’t want any dust or residue at all, it will effect the quality of the finish.
- Once clean and dry, brush on a thin coat of the poly (apply in direction of grain). Wait a couple hours, then do another coat. (You may be fine at this point, table should be sealed. If mars in old finish are still showing through you either need a darker poly or another coat.*
- Let the table top completely dry before putting anything on it. Drying time will be effected by number and thickness of the coats. Mine was dry overnight, but I gave it a few more hours before placing anything on it just-in-case.
If you have a table that puts you to shame, spruce it up today. You learned the marker and painting skills needed for this DIY hack, back in preschool. The stain markers are only a few dollars, and a small can of PolyShades was about $13, you will have plenty left too.
*My finish was really bad as you can see in the before picture, but I was on a tight deadline at the time, since this was part of a sponsored makeover post last spring [not for any products mentioned in this post]. The tables should have gotten 3-4 thin coats, but due to time issue I made the second coat rather thick and left it to dry overnight. They look 100 times better, and the finish is very durable, despite this.


