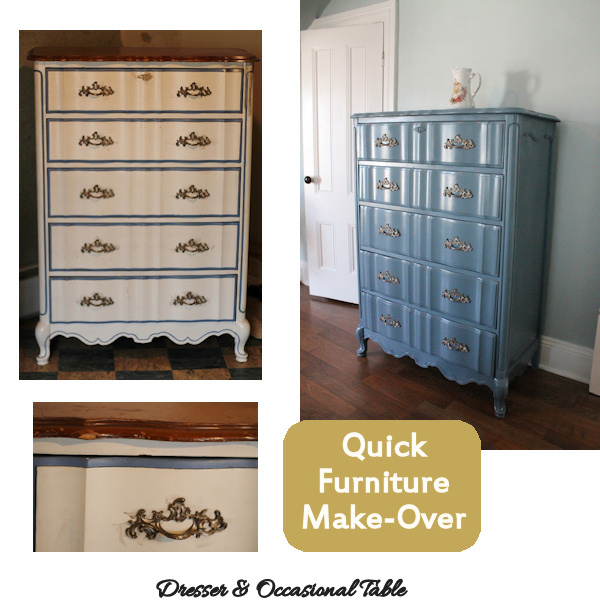
Whether you just want a fresh look, or you have an otherwise good piece of furniture with a damaged finish, refinishing does not need to be a complicated process at all. Spray paint can transform that crappy table or dresser that looks ready for the curbside into an attractive and useful piece of furniture. A lot of new furniture doesn’t have the character and quality of the old stuff either, so you may just end out happier with a roadside rescue that has been made over with a couple cans of spray paint, than you would be with a pricey new item.
The dresser above is a good example of this. It was given to me by a neighbor who was re-purposing the room it had been in. We had passed a few items along to him in the past, so he asked us before putting it out. The dresser was looking a bit scrappy, but it was solid wood with sturdy drawers, and was in just the style I wanted for this bedroom, so I gladly took it off his hands, and used it as is for awhile in an unfinished bedroom, until a place was ready for it. I had plans to paint it white, decorate it with tole painted florals and finish with an antiquing glaze. I am sure that would have been lovely, but I have way too many things on my to-do list for such an elaborate make-over. One day I just decided it needed to get done. The room had been ready for it, for several months.
I removed the hardware, which was painted antique gold using brush on metallic Martha Stewart paint from Home Depot. I very lightly sanded the dresser with fine grit paper. This was quick, and took about 30 minutes. I then wiped the surface with a damp cloth, to remove dust. Once it was dry, I sprayed on several thin coats of paint. The entirety of the project was done in a few hours, and much of that was drying time between coats. After the final coat I let it dry overnight before replacing the hardware back one and putting the drawers back in.
Tip: Make sure you have good ventilation and surrounding surfaces are well covered when spray painting. The airborne particles are not good on your floors and walls, nor in your lungs.
This small Victorian table is a piece I’ve had for quite some time. It had a nice cherry finish when I got it at an estate sale, but after being stored in a leaky garage for a few years, it looked more ready for the dumpster than my home. I decided to give refinishing it a shot though, since I really like the design of it & it is just the right size and height for a bedside table.
I filled some small gaps in the table’s surface with wood putty, which was sanded smooth after drying (due to the small amount of putty, dry time was quite short). The whole table was then wiped down with a wet cloth. Once fully dry, the table was sprayed with a few coats of semi-gloss black paint. It fits in great with the room, and I am happy I was able to salvage this interesting antique table.
Tip: Purchase good quality spray paint. It is not worth the savings of a couple dollars to end out with disappointing results.
So take a second look at that furniture piece you have in the garage, or see at an estate sale or on a curb. Ignore the color and finish, just focus in on the style and sturdiness of construction. You might just find yourself a treasure that can be transformed with just a few hours of your time and a couple cans of spray paint.
Note: Several people have contacted me to inquire about the color & brand of spray paint I used on the dresser. It is Rustoleum Slate Blue, which is commonly available. I believe I used a satin finish.


